PrimaSTEM is an educational tool for children aged 4-12, helping them learn to program without computers, tablets, or phones. It develops logic, programming skills, and mathematics.
Classes with PrimaSTEM make programming simple and visual for children. Even young kids find the process understandable and tactile - the basics of programming, logic, and mathematics are mastered in the form of a game.
Playing with PrimaSTEM promotes the development of key skills: logical thinking, algorithmics, programming, mathematics, geometry, as well as creative and socio-emotional development. The PrimaSTEM kit is a preparatory step before getting acquainted with block-based programming languages like Scratch or LOGO.
Getting to Know the Educational Kit
Where Can PrimaSTEM Be Used?
Usage is effective in the following educational programs:
- Preschool education centers
- Kindergartens with Montessori methods
- Elementary school
- Homeschooling
- Special development centers
- After-school groups
- Beginner programming clubs
- Children’s educational camps
What Do You Need to Know to Get Started?
Before working with the kit, we recommend teachers and parents review the user manual and this guide. No special programming skills are required - the materials provide the necessary basics to begin teaching.
Research and Value of the Kit
PrimaSTEM is inspired by the programming language LOGO, created by Seymour Papert, and Montessori pedagogy. LOGO and the turtle robot made programming visual and accessible for children.
 PrimaSTEM command chips implement this approach. Learning becomes intuitive through simple tactile control, requiring no screens or text.
By observing the robot, children learn to understand each command, mastering algorithms in practice.
The robot has an important quality: it has a direction, which allows the child to identify with it and more easily understand the basic logic of how programs work.
All commands are simple and clear: they indicate in which exact direction the robot should move. Teaching the robot to “act” or “think” makes children reflect on their own actions and thoughts, making the programming learning process more effective.
PrimaSTEM chips are a visual and simplified representation of programming languages. At the beginning of learning, there are no texts or numbers - only basic commands.
PrimaSTEM command chips implement this approach. Learning becomes intuitive through simple tactile control, requiring no screens or text.
By observing the robot, children learn to understand each command, mastering algorithms in practice.
The robot has an important quality: it has a direction, which allows the child to identify with it and more easily understand the basic logic of how programs work.
All commands are simple and clear: they indicate in which exact direction the robot should move. Teaching the robot to “act” or “think” makes children reflect on their own actions and thoughts, making the programming learning process more effective.
PrimaSTEM chips are a visual and simplified representation of programming languages. At the beginning of learning, there are no texts or numbers - only basic commands.
Why Wood?
🌱 The controller and robot are made of wood. Practice has shown that children prefer playing with wooden toys - they are safe, durable, and create an individual usage history.
Programming Concept with PrimaSTEM
Physical PrimaSTEM chips are analogous to instructions in real programming languages, demonstrating important concepts.
Algorithms
Algorithms are a sequence of precise commands (chips) that make up a program.
Queue
Commands on the PrimaSTEM controller are executed strictly from left to right, visually demonstrating the execution queue.
Error Correction (Debugging)
An error is easy to fix: simply replace the chip. This approach develops the skill of independent program debugging.
Function
A function (subroutine) is a set of commands in the lower part of the controller, called from the main program by the “Function” chip.
Application in Other Subjects
PrimaSTEM helps master other skills:
- Communication: Group play promotes collaboration.
- Motor skills: Working with chips improves coordination.
- Social skills: Children learn confidence and collaborative problem-solving.
- Mathematics: Basic mathematical concepts are mastered.
- Logic: Children learn to build sequences and predict outcomes.
By building a chain of chips, the child masters programming tactilely, visually, and mentally. After pressing the “Execute” button, the robot moves, and the result is compared with the child’s expectation. This comprehensive experience accelerates learning.
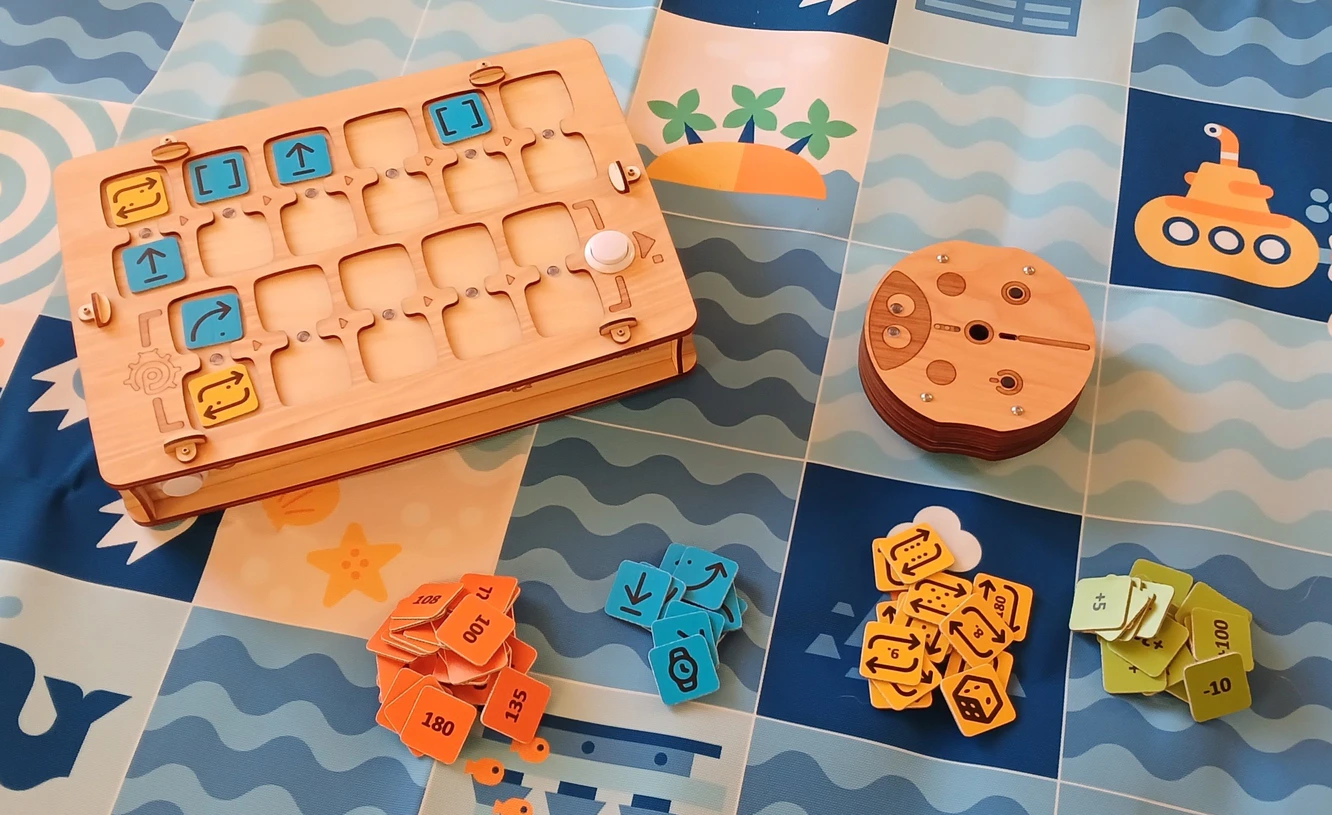
Getting to Know the Robot and Controller
The Robot
Tell children that the robot is their friend that they can program. Explain: it has no thoughts of its own and only executes their instructions - like a household appliance that needs to be turned on.

The Controller
Explain that the controller transmits commands to the robot. Show how to install command chips and program the robot.

The main program is built in the top row of the controller (6 cells). The bottom row (5 cells) is for the function subroutine and is used with the “Function” command.
Command Chips
Chips are commands for the robot that are inserted into the controller. After pressing “Execute”, the robot executes the sequence. Each chip is a separate command, teaching children computational thinking and program design. It’s important that children understand what the robot does when each command is activated. This teaches them program design and predicting robot actions. Explain to children: chips must not be lost or damaged, without them the robot cannot move.
1 - First Program
Cause and Effect
The main goal is to show children the connection between command and action. Let the child insert the “Forward” chip into the first cell of the controller and press “Execute”. The child should see the correspondence between the chip and the action.

Unambiguous Instructions
Repeat the steps with each direction (forward, turn left, turn right) until the child can recognize each chip.
First Task
Set up the game board or create a 15x15 cm grid using tape or a marker. Place the robot on the starting cell. Ask the child to create a program to move forward one cell. If the wrong chip was chosen, return the robot and suggest reasoning about a new option.
2 - Program and Debugging
Event Queue
Place a target two cells in front of the robot.
 Let the child create a program of two chips to reach the target.

Sequence of Three Chips
This time, the target is one cell forward and one cell to the right.
 Let the child choose the correct command sequence themselves.
 Don’t worry if the wrong chip was chosen. Simply return the robot to its original position and ask the child to reason about their choice and try new options.
Debugging - Finding the Error
Place the arrival point one square in front of the robot and one square to its left.
 This time, create a program to solve the problem by intentionally inserting an incorrect turn into the sequence.
Ask the child to predict the incorrect command in the program and independently predict the incorrect result, then allow them to press the “Execute” button to confirm their hypothesis.
After the child has confirmed that the presented sequence was incorrect, either through reasoning or verification, allow them to change the incorrect command to the correct one, thus debugging the program.
This time, create a program to solve the problem by intentionally inserting an incorrect turn into the sequence.
Ask the child to predict the incorrect command in the program and independently predict the incorrect result, then allow them to press the “Execute” button to confirm their hypothesis.
After the child has confirmed that the presented sequence was incorrect, either through reasoning or verification, allow them to change the incorrect command to the correct one, thus debugging the program.

3 - Program with Function
”Function” Command
When the basic commands are mastered, introduce the Function command chip. This is a repeatable set of commands that can be accessed from the main program.
To explain how this works, you can use the tower metaphor (under the function chip, other commands are stacked one after another), explaining that more instructions can be placed inside a single chip.
Show an example: first place two “Forward” chips in the upper cells and execute the program - the robot will move two cells.
 Now place the same two “Forward” chips in the function (bottom row), and use “Function” in the main program. The result will be the same, but now part of the program is hidden in a subroutine.
 Next, create the sequence: Forward - Forward - Right - Forward - Forward.
 Ask the children to find the repetitive parts and “hide” them in the function. The final sequence: in the main part - Function - Right - Function, at the bottom - Forward - Forward.

Solving Tasks with Function
Give the child 3 “Forward” chips and 2 “Function” chips.
 The task - move forward 5 cells.
 Let the child understand that they need to use the function for multiple actions and solve this task.
If the sequence is incorrect, simply return the robot to its original position and ask the child to reason about the correct solution of the task and try new options.
Let the child understand that they need to use the function for multiple actions and solve this task.
If the sequence is incorrect, simply return the robot to its original position and ask the child to reason about the correct solution of the task and try new options.

4 - Randomness
”Random Direction” Command
To introduce the concept of randomness, take 4 direction chips: “Forward”, “Left”, “Right” and “Back”, place them in an opaque box or bag, mix them and ask children to draw 1 chip without looking and show it to the group, then return it. Explain to children what randomness from four states is using this example.
Then show the children the “Random Movement” command chip.
Explain that this chip does almost the same thing they were doing before by drawing random chips from the bag: it randomly chooses a direction where the robot will go and then moves it 1 logical step - one cell. That is, the robot can move 1 cell forward, right, left or back.
Place the “Random Movement” chip in the upper cell and execute the program several times - the robot will move differently each time.
 Play with the children: let them guess where the robot will go before executing the command.
Emphasize that this is randomness and you cannot always guess the direction correctly.
Try making a small game using the “Random Movement” chip together with the children.
Play with the children: let them guess where the robot will go before executing the command.
Emphasize that this is randomness and you cannot always guess the direction correctly.
Try making a small game using the “Random Movement” chip together with the children.
5 - Loops (Command Repetitions)
Getting to Know Numerical Loops
Show the children the value chips, ask if they know numbers, if they have seen a dice for board games, if they have played such games.
 Place two “Forward” chips in the upper cells and execute - the robot will move two cells.
 Now leave one “Forward”, and place the “loop 2” chip under it. The result will be the same: the action will be repeated twice.
 Install 4 “Forward” commands, look at the result, and then ask the children to use value chips - loops - to repeat the robot’s movement for 4 cells.
Both simple task solutions with installing the “Forward” chip and loop value 4 are possible, as well as other options: for example “Forward” with loop number 3 and another “Forward” command.
Install 4 “Forward” commands, look at the result, and then ask the children to use value chips - loops - to repeat the robot’s movement for 4 cells.
Both simple task solutions with installing the “Forward” chip and loop value 4 are possible, as well as other options: for example “Forward” with loop number 3 and another “Forward” command.

Function Call Loop
Try with the children to apply a loop with values to the “Function” command: for example, making the robot walk in a zigzag using the “Function” command with a loop value of 5 and the functional sequence in the lower part of the controller with the commands “Forward”, “Right”, “Forward”, “Left”.
First create with the function a program for “step” movement - “forward”, “right”, “forward”, “left” and execute it.
Then add a loop with number 5 to the function, thus repeating the function several times, the robot will move in steps to the right - up.
 The robot will move in a staircase diagonally to the right and up, making 5 steps along the way.

6 - Random Numbers
Concept of Random Number
Among the chips is “Random Loop Number” (with a dice image). It selects a random value from 1 to 6. Play a game of drawing loop chips from a bag.
 To introduce the concept of a random number, take 4 loop chips: “2”, “3”, “4” and “5”, place them in an opaque box or bag, mix them and ask children to draw 1 chip without looking and show it, naming the values, then return it. Play a game: who draws the higher value. Explain to children what randomness from four states is using this example.
Then show the children the “Random Loop Number” value chip. Explain that this chip does almost the same thing they were doing before, by drawing random value chips from the bag: it randomly selects 1 of 6 numbers (from 1 to 6), like a dice, to transmit to the robot and repeat actions.
Place the “Forward” chip in the upper cell of the controller, and the “Random Loop Number” chip under it. Ask the children to press the “Execute” button. Return the robot to its original place. Repeat this task several times.
To introduce the concept of a random number, take 4 loop chips: “2”, “3”, “4” and “5”, place them in an opaque box or bag, mix them and ask children to draw 1 chip without looking and show it, naming the values, then return it. Play a game: who draws the higher value. Explain to children what randomness from four states is using this example.
Then show the children the “Random Loop Number” value chip. Explain that this chip does almost the same thing they were doing before, by drawing random value chips from the bag: it randomly selects 1 of 6 numbers (from 1 to 6), like a dice, to transmit to the robot and repeat actions.
Place the “Forward” chip in the upper cell of the controller, and the “Random Loop Number” chip under it. Ask the children to press the “Execute” button. Return the robot to its original place. Repeat this task several times.
 Play: whose robot will go further.
Draw the children’s attention to the fact that the robot moves a random number of cells: from 1 to 6. Emphasize that this is randomness and you cannot know in advance how far the robot will go.
Play: whose robot will go further.
Draw the children’s attention to the fact that the robot moves a random number of cells: from 1 to 6. Emphasize that this is randomness and you cannot know in advance how far the robot will go.
7 - Numbers: Distances and Angles
Getting to Know Numbers
Without installing numerical values for commands (above or below the command in the double cell), the robot uses default movement parameters: without parameters, the robot moves forward 15 cm and turns 90°. These values can be changed using value chips.
Example: Add the value 200 to the “Forward” command and see what distance the robot will travel. Add the value 180 to the “turn” command and evaluate the changes.

Important: The controller saves the last value set for movement and turn commands. If a command is used without a new value, the last saved value applies until the controller is turned off. Setting a new value changes the default value. Default values (150 mm = 15 cm and 90°) can be restored by setting them explicitly or by restarting the controller.
Changing parameters allows creating more complex trajectories and movement scenarios. See examples on the mathematical drawings page.
8 – Arithmetic
Arithmetic Operations
Arithmetic operations with numbers allow dynamically changing values in the program for movement commands (Forward, Back, Left, Right), making robot control more flexible.
When adding an arithmetic operation, the controller changes the saved number for the movement command and sends the new value to the robot.
Example:
 “Forward 200” — the robot moves 20 cm, “Forward +100” — another 30 cm. Total distance: 50 cm.
Using such operations in a loop allows creating progressions.
“Forward 200” — the robot moves 20 cm, “Forward +100” — another 30 cm. Total distance: 50 cm.
Using such operations in a loop allows creating progressions.
If the result of an arithmetic operation becomes negative, the robot performs the opposite action: instead of moving forward, it moves backward; instead of turning left, it turns right.
Available: addition (+), subtraction (−), multiplication (*), division (/), square root (√), exponentiation (^).
Pattern examples are shown on the mathematical drawings page.
Play and Learn with Children!
You know your students best. PrimaSTEM is a universal tool for game-based learning. Use it to teach programming, logic, and other subjects. Everything depends on your imagination!
p/s: Thank you for using PrimaSTEM and for your interest! We await your feedback, write to us about your experience and impressions. Last modified on May 27, 2026