Guide for conducting classes with children from 4 years old
PrimaSTEM helps children step by step master logical thinking, the basics of programming and mathematics. This guide will help you conduct classes with children from 4 years old.
How the device works
The goal of the device is to program the movements of a small ladybug robot using command tokens placed on a control panel.
- “Forward” command — move straight
- “Left” command — turn left
- “Right” command — turn right
- ”[ ]” (Function) token — replaces a sequence of commands
- “Repeat” — repeats a command or function several times
You place commands on the panel, creating a program for the robot’s movement. When the program is ready, press the button — and the robot will follow the instructions!
Contents of the guide
- Why conduct robotics and programming classes?
- Tips for organizing classes in different conditions
- Activities and learning objectives
- Detailed instructions for use
- Description of activities
- Appendices
- About the project and authors
Pedagogical value
- Screen-free programming — with hands
- Understanding that machines work according to algorithms
- Planning actions in advance
- Development of logical thinking
- Introduction to sequential programming and functions
- The concept of “bug” (an error in the code) and debugging skills
- Visual study of numbers, arithmetic, and geometry
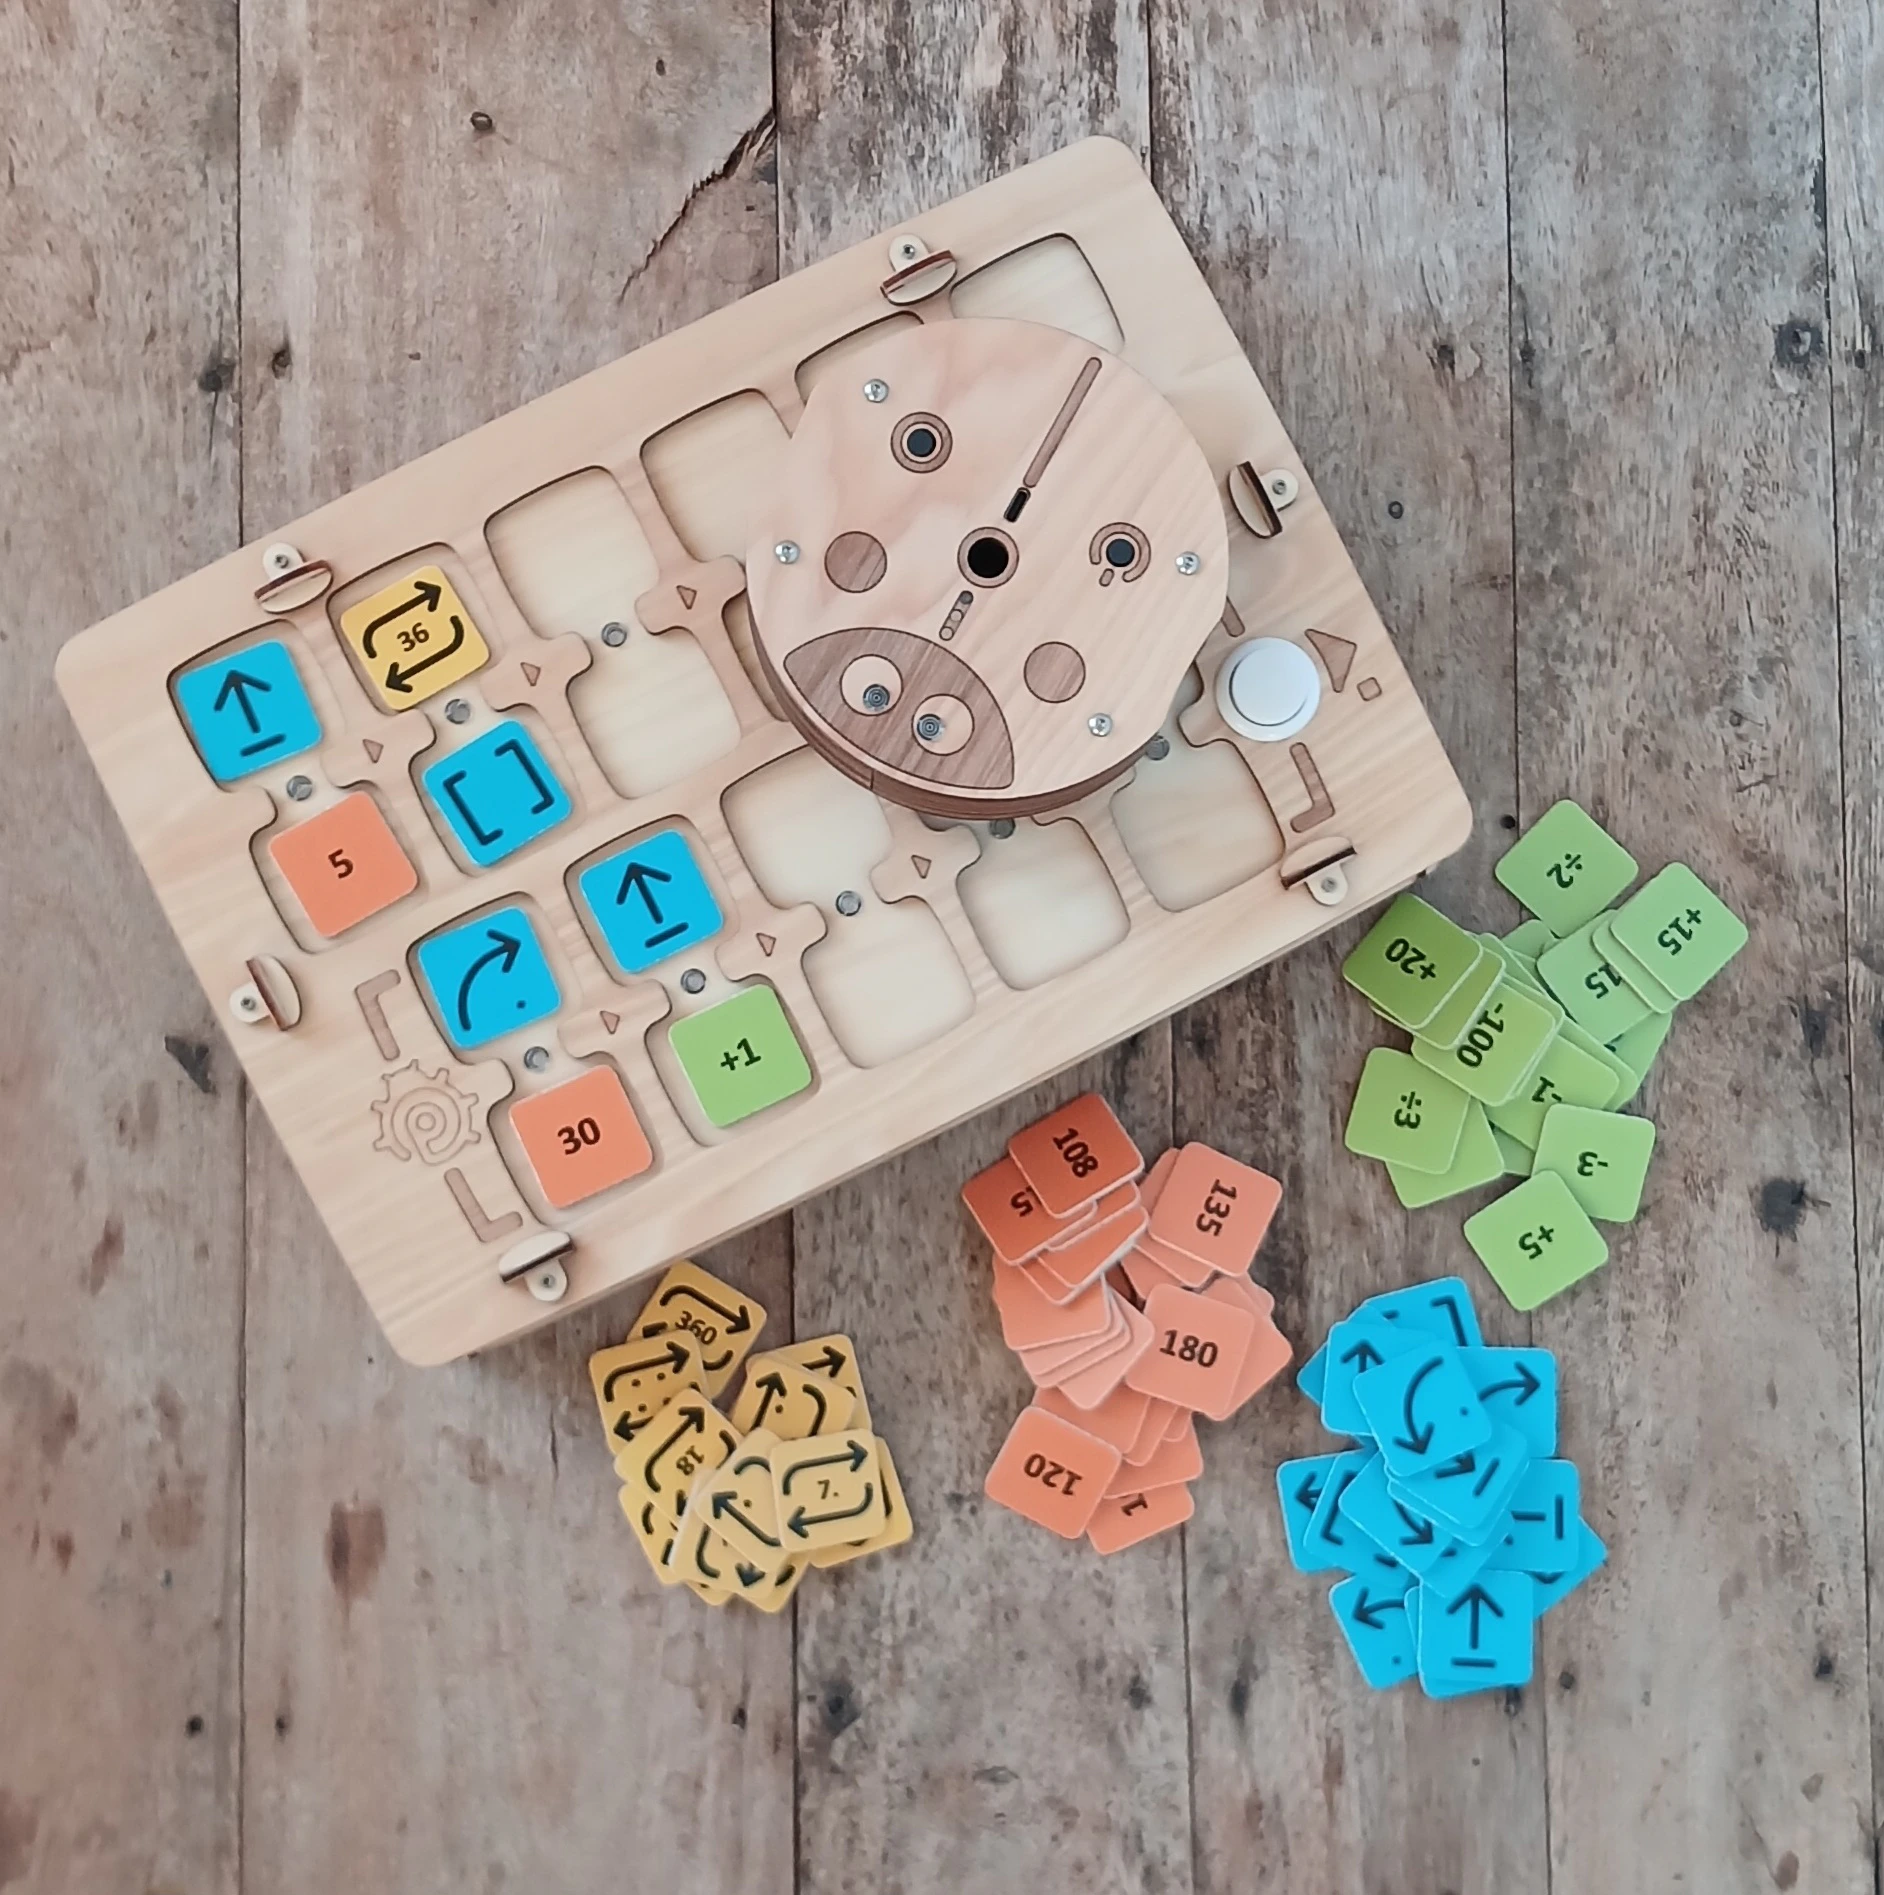
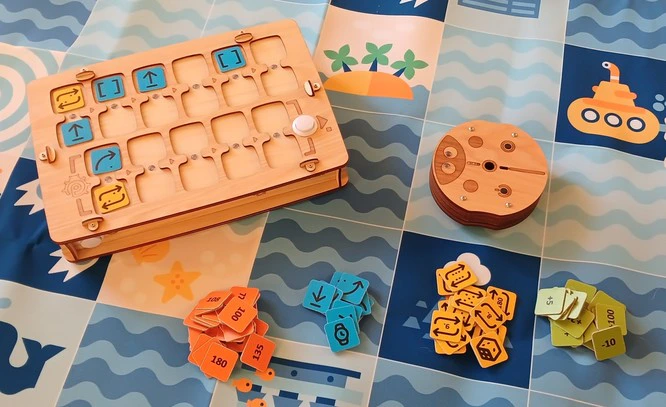
What PrimaSTEM consists of
What’s in the box:
- Ladybug robot
- Control panel
- Command tokens *
- Activity guide *
(*) Composition may vary depending on the configuration
Why conduct programming and mathematics classes?
Code, programming, and automation have become part of our daily lives.
In recent years, people have learned to create machines that do things they were previously unable to do: understand, speak, hear, see, respond, write.
There are many examples: self-driving cars, assistant robots for the elderly, delivery robots, and others.
Why programming and robotics?
Learning to program is not just learning to write code. Learning to program means learning to understand the machines that surround us. It is the ability to turn small or bold ideas into real projects. It means taking complex tasks and breaking them down into simple steps. It is a collaborative effort to solve our problems.
Born in the digital age
Today it may seem that children and young people are well-versed in technology because they actively use digital entertainment.
But what about taking these tools into their hands for creativity or self-expression? What happens when they encounter a technical problem?
Tips for use depending on the context
The activities were developed for various goals and educational contexts. The guide presents numbered activities. Below we recommend activities based on your conditions.
Target audience
- Children from 4 to 8 years old.
- Senior and preparatory groups of kindergarten, 1st and 2nd grades of primary school.
1-2-x-4-5-6-7-8-9-10-x-x
Recommended activities for school learning
x-2-3-4-5-6-7-8-9-x-11-12
For working with PrimaSTEM, it is desirable to form a group of no more than 12 children so that everyone can participate actively.
We recommend using one device for 2-3 students for team learning and developing social skills.
School activity
In a lesson for working with PrimaSTEM, it is ideal to form small groups of 4-6 children with one teacher. At this time, other students can work on another task with a teacher’s assistant or, for example, practice drawing the robot’s path according to the program (for 1st-2nd grade students). In both cases, it is preferable to conduct PrimaSTEM sessions in a multipurpose hall, right on the floor or by pushing tables and chairs aside to clear space.
Attention: Do not forget to charge the batteries of the control panel and the robot in advance.
Activity numbers and their learning objectives
| Activity | Understanding the concepts of algorithm and program | Decomposition of the route into stages | Anticipating movement | Problem solving, program debugging | Teamwork, cooperation |
|---|
| 1 | | X | | X | |
| 2 | | | X | | X |
| 3 | X | X | | | |
| 4 | X | X | X | | |
| 5 | X | X | X | | X |
| 6 | X | X | X | X | X |
| 7 | X | X | X | X | X |
| 8 | X | | X | X | |
| 9 | X | X | X | X | X |
| 10 | X | | X | X | |
| 11 | X | X | X | X | X |
| 12 | X | X | X | X | X |
Instructions for use
Contents of the instructions
- Introduction to materials
- Programming a function
- Maps used
- Technical explanations
Introduction to materials
Robot
A small wooden ladybug robot with two eyes.
 It has three points of support: two wheels and a stand in the back, which allow it to maintain balance.
Basic commands
| Command | Illustration | Description |
|---|
| Forward |  | The robot advances one cell — a logical step (by default equal to 15 cm) |
| Left |  | The robot turns 90° left |
| Right |  | The robot turns 90° right |
| Back |  | The robot drives back one cell — a logical step by default |
| Function |  | The robot executes the sequence of commands located in the function line |
| Repeat № |  | The robot repeats the command set in the paired cell a certain number of times — № |
Remote Control
The remote control allows you to control the robot by placing command blocks (tokens) in available slots (D).
The 6 upper dual slots (A), connected by an execution line (E), make up the main program sequence. The program starts with the slot on the left (D) and ends above the START button (B), which allows you to send instructions to the robot and start the program.
 The 5 lower slots (C) allow you to program a sequence of movements executed by the ”[ ]” block — the “function”. Each dual slot is associated with an LED (F), which lights up when a token is installed and flashes when the current instruction is being executed.
Creating a sequence
When you insert a token into one of the slots and it is correctly positioned, the LED lights up green. When adding a repeat command to a movement command in a paired slot, the LED lights up blue. If tokens are installed incorrectly (for example, two movement command tokens in a paired slot), a red LED lights up. In this case, the erroneous command will be ignored when the program is executed.
The robot and remote control are powered by built-in rechargeable batteries. They are charged via a USB-C port. The power button (ON/OFF) is located on top of the robot and on the front of the remote control on the left.
When the robot or remote control is turned on, a short beep sounds. When the remote control is on, the LED on the front panel lights up green. When the robot is on, the LED near the USB-C connector lights up green.
Wireless communication
The robot and remote control communicate via Bluetooth wireless communication with a range of about 5 m. The wireless system works in the background, without setup, after the first connection of the robot to the remote control.
The remote control can be configured to work with another robot (pairing devices).
- Turn on a robot not paired with the remote control.
- Turn on the remote control.
- Hold down the START button on the remote control for 10 seconds until the audio and light signal.
Creating and executing a program
The sequence of movements (“program”) starts on the left on the remote control and follows the engraved sequence of arrows ”>” — the execution line connecting horizontally paired slots.
If a token is added after an empty slot, its corresponding instruction will be executed after skipping the empty slot.
If an incorrect token is set (for example, “Repeat” without a command in one paired slot) or a combination of movement tokens in a paired slot (for example, two command tokens in one paired slot), then the LED will light up red, and such part of the program will be skipped during execution.
 Once the sequence is set, press the “START” button to launch the program.
When the robot executes the instructions, the LEDs on the remote control go out sequentially. When a command is being executed, its corresponding LED flashes.
Once the sequence is set, press the “START” button to launch the program.
When the robot executes the instructions, the LEDs on the remote control go out sequentially. When a command is being executed, its corresponding LED flashes.
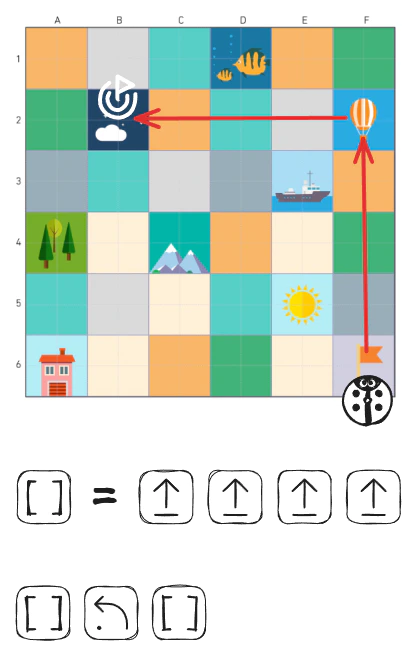
Programming a function
Creating a function
The ”[ ]” block, also called the “Function” block, is used to replace a sequence of commands.
The “Function” block allows you to perform more complex sequences and move on to more difficult tasks. To create a function, insert a sequence of movements into the designated field — 5 dual slots at the bottom of the remote control. This sequence is executed from left to right every time a “Function” block is encountered in the main sequence (top).
 In the example below, the “Function” block replaces moving straight and then turning right. The main program calls the “Function” 2 times, then repeats the “Function” 2 more times using the “Repeat 2” token.
 Movement result:

Maps used
Maps
For initial lessons — teaching algorithms, programming, and numbers — the robot must move on a map with a grid. It is recommended to use maps with 15 cm cells: this is the distance the robot covers in one default step.
You can use any maps designed for any robots with any (suitable for the robot) cell size.
It is possible to change the default step distance from 15 cm to any other for the map you have — 10 cm, 12.5 cm or 20 cm. To do this, use a special setup command “Step” + number in mm (for 10 cm use 100, for 12.5 cm — 125, for 20 cm — 200).
If you don’t have a map, make it with your own hands: you can use masking tape and a flat table or floor surface, a sheet of Whatman paper (thick banner fabric), and a marker to create a map.
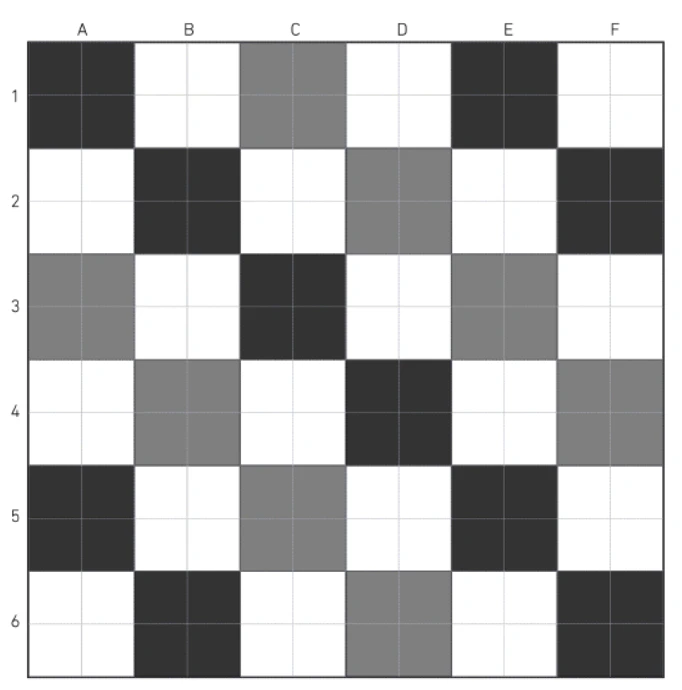
A chessboard map or a blank map with cells is used to practice moving from one point to another without distraction by colors.
To tell short stories about the robot’s movements, you can use a colored map. For example: “The ladybug leaves the house and goes to the mountains through the forest.” You can suggest that the class create a new map to tell new stories about the ladybug’s travels.
Examples of maps:
Chessboard map
 Colored map

Technical explanations
From a technical point of view
The control panel and the robot use microcontrollers for control, operate on Li-Ion batteries, and connect via a radio channel using a standard communication protocol — Bluetooth.
The robot’s circuit board is responsible for all its behavior: it controls two 5V DC motors, two multicolor LEDs, plays sounds, communicates with the remote control, etc.
The remote control’s circuit board identifies the tokens inserted into the slots, plays sounds, and controls 11 multicolor LEDs associated with each paired slot.
When a token is inserted into one of the remote control’s slots, it is identified using an NFC sticker chip. Each token contains a code corresponding to a control command.
After the tokens are identified on the remote control and the program is started, the commands are sent to the robot via wireless communication for execution.
You can create your own command tokens!
You can create additional command tokens (for example, “Repeat 12” or additional movement tokens) using “blank” tokens with NFC stickers and an NFC-enabled phone. Most 13.56 MHz types are supported.
Video instructions are available on our YouTube channel — https://www.youtube.com/@primastem
Activities
Detailed description of activities
- Activity 1 — Moving across a chessboard from point A to point B
- Activity 2 — Introduction to PrimaSTEM
- Activity 3 — Understanding the concept of orientation and algorithm through embodiment in a robot
- Activity 4 — Anticipating robot movements based on a sequence of movements
- Activity 5 — Understanding how instruction sequences work in a random program
- Activity 6 — Using the remote control and movement commands to take the robot to the mountains
- Activity 7 — Introduction to the “function” command
- Activity 8 — Using a function to chart a route to a goal
- Activity 9 — Debugging a program with an error
- Activity 10 — Thinking about debugging sequences with 1 error on paper
- Activities 11 and 12 — Anticipating robot movements (with a “function” block)
Activity 1: Moving across a chessboard from point A to point B
- individually
- 15 min
- on paper
- printable documents
Goal
Project a move across cells from point A to point B on a map.
The exercise lasts 10 minutes with a debriefing.
For printing
For this activity, you will need to print one copy for each student of the “Appendix 1 — Moving on the map” sheet.
EXERCISE
Children must draw on the grid the path the mouse must take to reach the cheese. You can start with the left exercise, which is simpler, and then continue with the right one.
Moving across cells
The mouse moves through the cells of the grid (note: you cannot move diagonally). Here you need to understand that the mouse’s path is divided into stages: it moves one cell at a time. It is said that it moves step by step.
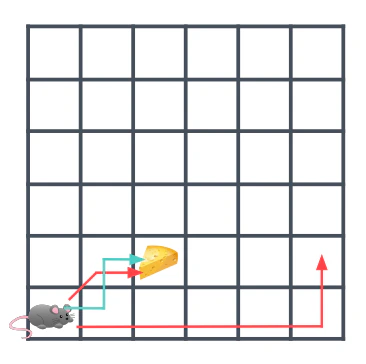 In the example above, only the blue path is correct. The short red path is incorrect as it includes a diagonal. The long red path is incorrect as it does not lead to the desired point.
Discussion in the group…
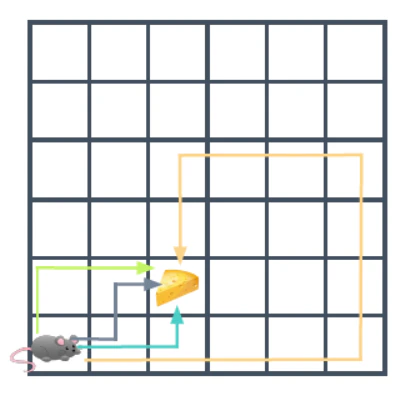 For example, in the example above, all drawn paths are correct, as they all allow the mouse to reach the cheese.
Show the children that not everyone thinks of the same path, but several paths can be correct.
For example, in the example above, all drawn paths are correct, as they all allow the mouse to reach the cheese.
Show the children that not everyone thinks of the same path, but several paths can be correct.
Some paths are longer than others
If you count the number of cells the mouse must pass to get to the cell with cheese, you get:
- 3 cells for the green route
- 3 cells for the gray route
- 3 cells for the blue route
- 13 cells for the yellow route
The shortest path
In the end, even if all these paths are correct, the mouse will choose the shortest one.
Ask the children to answer this question: “Why did the mouse choose the shortest path?”
Several answers are possible: the mouse wants to save energy, it is very tired and wants to walk as little as possible… Or the mouse is in a hurry, it is very hungry and wants to get to the cheese as quickly as possible.
Note for the facilitator: It’s the same with robots. We will always prefer the shortest path for efficiency reasons.
Multiple paths are possible
After finishing the exercise, ask the students to show the path they drew. Since there are always several possible scenarios, it is likely that the students will offer different but all correct answers.
Activity 2: Introduction to PrimaSTEM
- 15 min
- in a group
- demonstration
- practice
Goals
Understand the robot’s movement capabilities Learn that the remote control controls the robot Understand command tokens
For this activity, form small groups of students. Sit at a low table or on the floor. Take out the grid map, the remote control, the robot, and the tokens. Introduce PrimaSTEM to all students and groups one by one.
Presentation
Present each element on the table and introduce the vocabulary that the children will need.
First, the map: it’s like the grid they worked with during activity 1, but bigger.
Then the ladybug robot: it can roll.
It is controlled with a remote control, depending on the tokens we put in the slots.
Tokens are instructions: they allow you to tell the robot to move forward, turn left or right.
1st stage: demonstration
Once you have explained the vocabulary, perform the manipulation yourself and show the children what happens when you put a token in the remote control.
| Image | Description |
|---|
| The “Forward” command token makes the robot move one cell |
 The robot will advance one cell forward.
2nd stage: hand over control
| Image | Description |
|---|
| The token with an arrow turning in an arc around the center is “Left” — it makes the robot turn left, counterclockwise. The default rotation step is 90 degrees. |
| Image | Description |
|---|
| The “Right” token makes the robot turn right. |
The program can be stopped by pressing the START/STOP button again while the robot is moving.
Activity 3: Understanding the concept of orientation and algorithm through embodiment in a robot
- 45 min
- In a group
- Game
- Map
Goals
Consider the robot’s orientation at the beginning of the program Anticipate robot movements depending on the program
For printing
For this activity, you will need to print one copy for each student of the “Appendix 2 — Mission Cards” cards.
Game Principle
A role-playing game in an open space where children represent the robot on a black and white field.
Game Rules
One student acts as the robot on the map (or on the floor with a square pattern — a pattern, tiles, or thin masking tape stuck to the floor), and other students program him using task cards.
No indications are given as to which direction the child-robot is facing. Determine which direction of the robot is correct for completing the mission.
- The “child-robot” stands on red cell 1, he must reach green cell 2.
- The “child-robot” stands on red cell 1, he must reach purple cell 3.
- The “child-robot” stands on red cell 1, he must reach blue cell 4.

To ensure the durability of the map material, ask the child to remove their shoes.
End of the game
The child now understands that the position and orientation of the robot must be taken into account when programming a move.
The robot responds to a move command depending on how it is turned, oriented. It must either move straight, or turn left, or turn right, BUT it will move depending on its initial orientation.
Activity 4: Anticipating robot movements based on a sequence of movements
- 45 min
- individually
- on paper
- printable documents
Goals
Consider the robot’s initial orientation Understand program instructions Anticipate robot movements depending on the program
For printing
For this activity, you will need to print one copy for each student of the “Appendix 3 — Draw the path for a given sequence” cards.
Children are given a sheet with a program consisting of a sequence of instructions. Children must draw the path the robot will take for this sequence of movements.
With this program, the robot will advance three times straight:
 Here is the same program, the robot will also advance three times straight. Only this time it is not oriented the same way at the beginning: it is looking to the right. Therefore, it will advance three times to the right:
 With this program, we introduce the robot’s rotation. This time the robot starts by turning right and then advances two cells:
 And finally, a more complex exercise with two changes of direction for the robot. It starts by advancing one cell straight, then turns right, advances one cell, then turns left and advances two cells:

Note for the facilitator
This exercise on paper can be difficult. If some children find it hard to understand robot rotations and sequences of movements, take the PrimaSTEM play set and ask them to reproduce the programs that are on the sheets on the remote control. By manipulating and observing, we understand better!
Activity 5: Understanding how instruction sequences work in a random program
Goals
Establish a connection between instructions and movements performed by the robot Visualize map boundaries Be able to transfer command instructions to the “control panel”
Game process
- To start, place the robot on the map, in any cell (recommended cell is at the edge of the map), in the desired direction.
- Roll the die to start. Move the robot manually and record (draw with the “Forward” command sign — an arrow) the program for moving on paper or a drawing board. If the robot goes off the map, roll the die again.
- Repeat the operation to get a sequence of 2 movement programs and prevent the robot from going off the map, rerolling the die if necessary.
In the end: you should have 2 programs of “Forward” commands on a piece of paper, which, after sequential execution, will move the robot the required number of cells towards the edge of the map.
Example:
 Reproduce the recorded programs in reality using PrimaSTEM.
Activity 6: Using the control panel and movement commands to take the robot to the mountains
- 45 min
- in a group
- practice
Goals
Decompose the route into stages Implement a program with a specific goal
For this activity you will need:
- control panel
- specific movement command tokens: 4 “Forward”, 4 “Left”, and 4 “Right” per group, leave the rest of the tokens aside.
- map and robot
Divide the children into groups of 3 or 4 children and give them a control panel and a set of tokens.
1st stage: reflection
The ladybug robot is at home, and we want to take it to the mountains. Here you will need to write a program on the board that will allow it to get there.
If you don’t have the right map, draw the necessary destinations schematically on paper, maybe with the children, and tape them to the map.
 Start by asking the children which cells they want to take the robot through to get to the mountain. Again, there are many possibilities, and we will prefer the shortest routes for energy and time saving reasons.
Once the path is determined, ask the children about the movements the robot will have to make, cell by cell.
Should it go straight, turn left, turn right? Show them what movement each command will produce on the robot, moving it across the map with your hands.
Start by asking the children which cells they want to take the robot through to get to the mountain. Again, there are many possibilities, and we will prefer the shortest routes for energy and time saving reasons.
Once the path is determined, ask the children about the movements the robot will have to make, cell by cell.
Should it go straight, turn left, turn right? Show them what movement each command will produce on the robot, moving it across the map with your hands.
2nd stage: programming
Ask the children to write, in order, the movements (program) that the robot must make to reach the goal on the control panel using the command tokens.
Here is the expected result of the program:

3rd stage: verification
As for any self-respecting programmer, one should check if the program works. Ask the children to reproduce their program on the remote control and launch it.
 Does the robot reach the mountain? If not, why? Let the children try to fix their errors in the program, if any.
Activity 7: Introduction to the “function” command
- 15 min
- in a group
- demonstration
Goals
Understand that the “function” command can replace other command instructions Consider the concept of repeating a sequence of instructions
For this activity, form small groups of students. Sit at a low table or on the floor. Take out the field-map, the remote control, the robot, and the command tokens. One by one, groups of students get acquainted with the “Function” block command.
1st stage: demonstration
Show the children the “Function” command token.
It serves to replace several movement commands: “Forward”, “Left”, “Right”, or “Back”. It also allows you to repeat the same small piece of the program several times.
Start with a demonstration. Create a program as shown in the picture below.
 When the “Function” command is used, everything happens as if we had put what is inside the [-----] frame at the bottom of the control panel in place of the “Function” token. In our example, the robot will advance twice straight.
2nd stage: riddles!
Now add a block with the “Right” command at the end of your main program, as in the figure below.
 Before launching the program, ask the children what will happen. Everything happens as if the program consisted of two red “Forward” blocks, and then one “Right” block. The robot will advance two cells and make a right turn (a quarter turn).
And for the final: the cycle! Reproduce the program with four “Function” blocks, as in the figure below.
Before launching the program, ask the children what will happen. Everything happens as if the program consisted of two red “Forward” blocks, and then one “Right” block. The robot will advance two cells and make a right turn (a quarter turn).
And for the final: the cycle! Reproduce the program with four “Function” blocks, as in the figure below.
 Before launching the program, ask the children what will happen, and then launch the program for verification.
The robot performs a cycle:
Note for the facilitator: When you begin to get acquainted with the concept of the “function” block, it is very useful to look at the LEDs that flash during program execution. This way you can follow the instruction being executed and see how the robot moves at the same time.
Before launching the program, ask the children what will happen, and then launch the program for verification.
The robot performs a cycle:
Note for the facilitator: When you begin to get acquainted with the concept of the “function” block, it is very useful to look at the LEDs that flash during program execution. This way you can follow the instruction being executed and see how the robot moves at the same time.
Activity 8: Using a function to chart a route to a goal
- 45 min
- in a group
- practice
Goals
Decompose the route into stages. Implement a program with a specific goal. Use a “function” block in the program.
For this activity you will need:
- tokens or homemade cards with drawings of commands: 4 “forward”, 4 “left”, 4 “right”, and 4 “function” per group.
- map and robot, without remote control.
If there are many children, then divide them into groups of 3 or 4 children and hand out cards with drawings of commands or tokens from the set (exactly 4+4+4+4).
1st stage: reflection
Adapt the task if you have a map with other images or without them — it is necessary to designate 2 points (Start and Finish) at a distance of 4 cells at an angle of 90 degrees.
The robot is at the flag, and we want to take it to the night cell, represented by clouds. You will need to write a program (lay out an algorithm from tokens or drawings of commands on the table) using the “Function” block.
Start by asking the children which cells they want to take the robot through to get to the mountain (a cell about midway). There are many possibilities, and this time we will prefer routes where instruction sequences are repeated in order to use the “Function” command.
Once the path is determined, ask the children about the movements the robot will have to make, cell by cell, and model the execution of the program by moving the robot with your hands.
2nd stage: “it doesn’t work! But if…”
Ask them to lay out with cards (tokens) on the table, in order, the movements that the robot should make.
Be strict about the number of command tokens given to each group: 4 “forward”, 4 “left”, 4 “right”, and 4 “function”.
That’s it! We don’t have enough tokens to write the program! There aren’t enough “Forward” commands! It’s digital panic! :)
Remind them of the usefulness of the “Function” command: with this command, you can replace several other command tokens.
For example, you can replace several “Forward” commands to make the robot move forward several times.
Guide the children in creating a program with a “Function” block, as in the picture below.
Example route and its program:
3rd stage: verification
Help children reproduce their program on the control panel for verification, as in the picture:
 Does the robot reach the “Night” cell? If not, why? Allow the children to try to fix their errors in the program, if any.
Activity 9: Debugging a program with an error
- 20 min
- in a group
- practice
Goals
Find an error in the program by observing its execution. Fix an error in the program.
For this activity, form small groups of students. Sit at a low table or on the floor. Prepare the grid field, the remote control, the robot, and the tokens. Ask groups of students to debug the program in turn.
We would like the robot to reach the mountain (gray path).
 Show the children the sequence of movements on the remote control that contains an error:
 With this program, the robot goes into the forest. By testing the program, children should try to find the error and fix it.
Example of a correct, corrected program:
With this program, the robot goes into the forest. By testing the program, children should try to find the error and fix it.
Example of a correct, corrected program:

Activity 10: Thinking about debugging a sequence with an error on paper
- 20 min
- individually
- on paper
- printable documents
Goals
Anticipate robot movements to find an error in the program. Understand how to fix an error in the program.
Children are given a sheet with a program consisting of a sequence of instructions for moving from point A to point B. The program contains an error, children must find this error and try to fix it.
For printing
For this activity, you will need to print one copy for each student of the “Appendix 4 — Find and fix an error in the program” cards.
1st stage: read the program
Start by asking the children to draw the robot’s movement with this program. The path we want the robot to take and the desired arrival point are drawn in blue on the grid.
2nd stage: identify the error
Once the path is drawn, we see that the robot is not going to the finish (black)! It arrives at the red flag. Ask the children where the robot went wrong. Here you need to find the cell that contains the error, circled in red in the correction.
There are 3 types of errors:
- we were wrong with the command
- we forgot a command
- we added an extra command
3rd stage: fix the error
And finally, ask the children to fix the error by writing a program to move to the black flag.
Note: This exercise on paper can be difficult. If some children find it hard to see where the errors are, take PrimaSTEM and ask them to reproduce the programs that are on the sheets and launch the program. You can, for example, ask them to say “Oh no!” when the robot makes a mistake on its way to record the error.
Example 1
In this example, we were wrong with the instruction at the end.

Example 2
In this example, we added an extra instruction at the beginning.

Example 3
In this example, we forgot an instruction at the beginning.

Activity 11: Anticipating PrimaSTEM movements
- 45 min
- in a group
- practice
Goals
Anticipate robot movements by looking at a program without a “function”
For this activity, take the PrimaSTEM play set without the “Function” commands. All children can participate in the game at the same time, but only one child at a time manipulates.
1. Silence, we are programming…
In turn, the children place the robot in a corner of the map and then compose a program with a maximum of 5 instructions on the remote control.
Once the program is finished, ask the children to wait before pressing the button.
2. Place your bets!
Ask the other children to guess if the robot will go off the map.
3. Check
Once we have placed our bets, we launch the program to check what happens. Then we put the robot back in the corner, and the next child starts their program.
Activity 12
Goals
Anticipate robot movements by looking at a program with a “function”
Reproduce activity 11, adding “function” commands to the set.
This time add “Function” blocks to integrate function programming. All children can participate in the game at the same time, but only one child at a time manipulates.
About the project, authors
Who are we?
PrimaSTEM is a company that created and produces the original eponymous device for teaching children from 4 years old programming and mathematics without a screen. We are located in the south of France.
The created materials are open-source and aimed at developing the creativity of children and the adults who accompany them.
To learn more about the PrimaSTEM device, visit the documentation resource site available in 10 languages: https://docs.primastem.com
Don’t hesitate to contact us: info@primastem.com
Our website with information and links to social media: https://primastem.com
Authors
Adaptation, text, illustrations: Andrei Chanov, 2026.
Authors of the concept: Julie Borgeot / Dorie Bruyas from Fréquence écoles
License of this guide
This work is licensed under CC BY-SA 4.0. To view a copy of this license, visit https://creativecommons.org/licenses/by-sa/4.0/
Creative Commons Attribution-ShareAlike 4.0 International
This license requires that reusers give credit to the creator. It allows reusers to distribute, remix, adapt, and build upon the material in any medium or format, even for commercial purposes. If others remix, adapt, or build upon the material, they must license the modified material under identical terms.

Appendices
Appendix 1 — Moving on the map
Appendix link — Appendix 1 — Moving on the map
Appendix 2 — Mission Cards
Appendix link — Appendix 2 — Mission Cards
Appendix 3 — Draw the path for a given sequence
Appendix link — Appendix 3 — Draw the path for a given sequence
Appendix 4 — Find and fix an error in the program
Appendix link — Appendix 4 — Find and fix an error in the programLast modified on April 26, 2026